
Having a problem with your laptop speakers is the worst. It is not like they used to rock your world before, but at least there was some volume. No matter how problematic laptop speakers are, there is always a way to fix them. Are you struggling with your laptop speakers?
If your Lenovo laptop speakers not working than it can be pretty tough for you to figure out on your own. In this article, we will focus on Lenovo laptops. However, we have a detailed guide about other laptops as well.
Lenovo Laptop Speakers Not Working: EXPLAINED
In case your Lenovo laptop speakers aren’t working, you can do several things to fix that issue.
Update the laptop:
The laptop offers updates now and then. These updates make sure your laptop’s function is up to date. Sometimes ignoring these updates can cause issues in your laptop. For this, you need to check regularly for updates.
The updates for your Lenovo laptop are available at https://support.lenovo.com/. Here you need to find Drivers and Software. Then select Automatic updates, and scan for updates.
Windows Audio Troubleshooter:

Windows audio troubleshooter is your way to go if you have Windows 7, 8, or 10. In order to work the windows troubleshooter, follow the following steps. Most likely it will make the speaker’s problem go away.
- Restart the computer
- Find the speaker icon in the taskbar, for some versions, it is in the system tray. Right click on it and select Troubleshoot sound problems.
- Now you’ll have to find anything that says, Find and fix audio playback problems. The name may be slightly different depending on the model of your Lenovo.
- This will give you an option to choose which function you want to troubleshoot. Here, simply choose speakers.
Most likely, whichever problem is causing the issue, the Windows audio troubleshooter will find it for you. If it fails to pinpoint anything, it is likely not because of the fault in Lenovo hardware or software.
Audio settings:

Sometimes, the audio settings are messed up, and thus the speakers malfunction because of them. All you need to do for this is to change a few settings, and your laptop is good to go.
Some Lenovo laptops allow the F4 key to mute the speakers in a shortcut which is why this can happen accidentally.
- At the bottom right corner of the screen, there is a volume icon that you have to click.
- Select the Open Volume Mixer
- You will be able to see the muted speaker with an icon. If this is it, just unmute it, and you’ll be good to go.
Sound Driver:

A sound driver is responsible for communicating the sound from the operating system to the speaker. In case your sound driver is out of date, you can experience issues with your speakers.
All you have to do is uninstall the sound driver. After you uninstalled it, the laptop will try and install it again upon restarting the computer. This way, you’ll end up with a perfectly working sound driver.
The instructions below are for windows 10 for deleting an out of date sound driver.
- Click the Windows icon present on the lower right side of your screen.
- Select Run. This will open a Run dialog box.
- You’ll have to open the Device manager, by typing devmgmt.msc into the Run dialog box and press OK.
- Now you will have to find a Sound, video, and games controller and expand it.
- Now you’ll have to find the sound card device name of our laptop speakers, and right click upon it, choose Uninstall or uninstall device.
- If confirmation is required, press Delete the driver software for this device, and finally press OK.
- Restart the laptop and let it sound the sound driver itself.

In case the above-mentioned trick did not work for you, it might mean you will have to update the sound driver yourself. For this, we have mentioned the steps below:
- Click the Windows icon present on the lower right side of your screen.
- Select Run. This will open a Run dialog box
- From here you’ll have to open the Device manager, by typing devmgmt.msc into the Run dialog box and pressing OK.
- Now you will have to find a Sound, video and games controller and expand it.
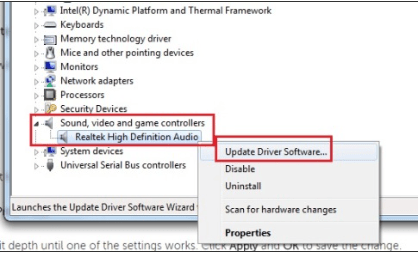
- Now you’ll have to find the sound card device name of our laptop speakers, and right click upon it, choose Update Driver Software.
- Later, search automatically for updated driver software.
- Restart the laptop once the installation is completed.
Configuration:
The speaker configuration is another common issue that many people fail to address when their laptop speakers malfunction.
It can be a little more complicated than just going to the settings and unmuting the laptop speakers, but it is not the most difficult task one can do.
Sometimes, the laptop is configured to an audio output that is other than the speakers. The laptop speakers are usually the default audio output configuration.
In short, double check what your laptop audio is being set to. If it is not the speakers of the laptop, change this little setting and soon you’ll be able to enjoy the sound as always. The following step-by-step guide is for Windows 10:
- On the lower right side of your screen, there is a sound icon, within the taskbar. Right-click this sound icon and choose Open sound settings.
- Go to Device properties and select additional device properties.
- Now go to Advanced and select 24 bit, 44100 Hz or 24 bit, 192000 Hz under Default format.
- Choose Apply and then select OK.
- You can also test other formats if this one doesn’t seem to work for you.
Restart audio services:
Sometimes, just restarting the audio services may help as well. The following guide is for Windows 10:
- Click the Windows icon present on the lower right side of your screen.
- Select Run. This will open a Run dialog box.
- From here you’ll have to open the Services, by typing services.msc into the Run dialog box and press OK.
- Find Windows Audio and double click on it.
- Here you can see if the service has been stopped. All you have to do is to start this service again.
- Also, choose the startup type as Automatic and choose Apply.
Frequently Asked Questions
Q- How do I get the sound back on my Lenovo laptop?
There can be a number of things that could have gone wrong with your speakers. For this, you can try different things. Firstly, make sure your laptop and sound drivers are up to date.
Also, double-check the speakers’ settings and your laptop’s configuration. By doing these, you can get the sound of your Lenovo laptop back.
Q- How do I enable internal speakers on my Lenovo?
For this, you have to search and select Sound settings, then go to the Sound Control panel. Once you’re in the panel, click on sound and select internal speakers. it will enable the internal speakers of your Lenovo to play sound.
Conclusion:
Lenovo speakers can stop working for various reasons. Luckily there are enough systems that can rule that out for you, for example, the Windows audio troubleshooter. In this article, we have discussed 7 ways of bringing the sound back to your speakers. If you still couldn’t get it back, we recommend seeking professional help or contacting https://support.lenovo.com/.
Here are some other great reads that you might enjoy!
HP laptop speakers not working.
Toshiba laptop speakers not working.
MacBook speakers not working.
Chromebook speakers not working.
Acer laptop speakers not working.
Alienware speakers not working.
Dell laptop speakers not working.


Leave a Reply