Subwoofers are designed to produce and tolerate low audio frequencies. A subwoofer’s voice coil may become separated from its voice cone when it is playingtoo loud music. Consequently, you will hear a buzzing sound coming from the subwoofer.
Many people have had a similar experience of having their subwoofer blow after purchasing it. Why not fix the existing subwoofer instead of buying a new one? By fixing the subwoofer, you will not only restore its original sound, but you will also save some money.
If you do not know how to repair your damaged or blown subwoofers, don’t worry, we will give you a step-to-step guide to fix them. So, let’s get started.
Don’t Forget To Read: How does a subwoofer work
Why Did Subwoofer Get Blown?
The reasons why subwoofer blow varies but can include factors such as too much volume or an amplifier clipping due to underpowering, or overpowering. Yes, underpowering can also result in damage to your subwoofer. It’s not uncommon to encounter a blown-up subwoofer. It can happen for many reasons, but thankfully does not render it obsolete!
So before deciding if you should dismantle or discard your subwoofer, check whether simple fixes could be made first by following this detailed guide on how beginners fix their broken subwoofer. Regardless, you still want to buy the new best subwoofer pair, which we also discussed in that previous article.
How to Repair a Blown Subwoofer?
Without further due, It’s time to repair that bad boy.
Required materials:
Firstly, when you are ready to begin repairing the blown speaker, be sure to have the following tools on hand:
- a screw-driver
- a soldering iron
- an air compressor
- and a multimeter (or tester)
Once those are accounted for, grab some putty knife or any other flat-edged tool and glue before proceeding with fixing it!

Steps To Repair The Blown Subwoofers:
First, a couple of checks should be done to diagnose why the speaker isn’t working.
1. Assess the voice coil:
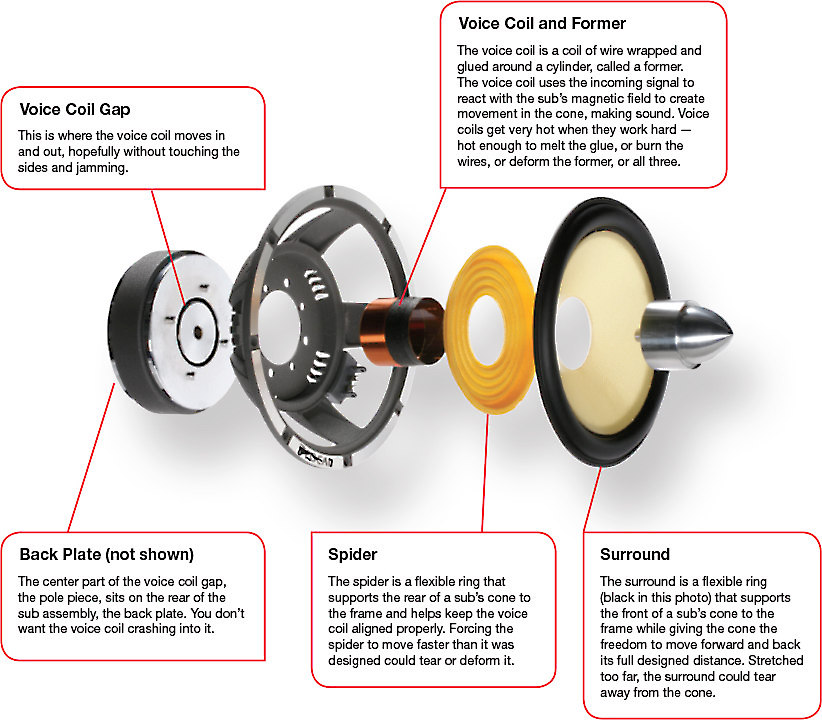
First of all, see what your subwoofer looks like! Before you begin, you should examine the voice coil. It is one of the essential parts of this whole thing because it amplifies current running through speakers and all that jazz. If it’s blown, don’t keep going; find out what went wrong or how to fix it before continuing with the rest of the process.
If you need to know if a specific speaker is working, it’s possible by checking the voice coil with a multimeter. Connect your two speakers and use the meter on them – one end should be connected to both ends.
When there’s no movement from that point on the dial after being turned all around, it means that either your coils are broken, or they’re just not correctly positioned in an area where the signal can reach them effectively enough for their deflection magnetism to work correctly (which would also mean these magnets aren’t close enough together).
2. Inspect the Speaker Cone
Having checked the voice coil, you can now move onto the speaker cone’s next component. It will be easy for you to assess this because it features a suspension system.
Furthermore, in case of damage to the subwoofers, push and sink your finger gently along the sides and circumference.
If it remains rigid when pushed by hand or sinks back into place slowly, then both components should work fine, but if not, all else might need some fixing too!
[su_quote style=”flat-light”]Read Also: Best Available Options For Shallow Mount Subwoofer.[/su_quote]
3. Separate the speaker from its frame
Depending on the results you obtained from assessing the voice coil and speaker cone, there are many ways to solve the issue.
To start fixing the speaker, detach its metal frame from the wooden board, which is present if you’d be using a rubber band, but if anything else like screws or nails are involved, use the available tool to do this.
To do this, turn off the power before disconnecting your wires. If you will not turn off the power, there might be a chance that it may blow right up again once you try touching anything inside of it!
4. Take out the speaker surround
Remove the Speaker Surround, which is one of the most fragile parts of any speaker, so be sure to take care when removing it.
A sharp blade, i.e., a putty knife or tester edge, separates around. You can use glue for binding of both sides of each corner on the top and bottom panels.
Finally, remove all adhesive from inside the front panel with your fingers while being careful not to puncture anything if you plan to fix this yourself later!
5. Remove the voice coil from the speaker cone:
This step may be a little tricky, but it’s worth the challenge. You’ll need to remove both the speaker cone and voice coil from your subwoofer with care.
Use caution when cutting terminal wires as you take them out of place; otherwise, they could contact other components in your device!
Remember that removing these two parts together could cause damage if not done with care!
6. Replacement of the Voice Coil:
What’s the first thing you need to do when fixing a subwoofer? Prepare a new coil. But before that, prepare yourself by removing any dust particles and dirt in the area of the voice coil gap with an air compressor!
Once all is clear for repair work, fix your new coils into place carefully, so they don’t come loose or break anything else on their way around.
The next step will be applying enough glue onto both sides (cone side and back) over top of where the old speaker used to be; make sure that there must be no dirt because if there is dirt, then there’s going to be problems later down the line- we want this as easy as possible! Let stand 24 hours after until dry.
7. Repair the speaker frame:
After you’ve reassembled and glued everything back together, it’s time to find a way to make your speaker sound even better. To do this, carefully apply some glue around the edges of what will be touching the frame before attaching them by using pressure so that they fit tightly against one another.
Let these sit for 24 hours for your new enclosure fix to work its magic trick on all those annoying slight vibrations from ruining an otherwise perfect listening experience!
8. Reassemble and Fix Other Parts
The last step is to put all the other components in place so that your speaker is ready to work! Remember those wires we detached earlier? Now, they must be re-attached back where they were. Take the terminal wire on our new voice coil and attach it at one end of the old terminals.
Then use a soldering iron for extra reinforcement. make sure you hold the subwoofers with both hands while doing this because otherwise, there are chances that you’ll burn yourself or even set off an electrical fire. So it is essential to take precautionary measurements while handling electronics.
Then try pushing gently against the cone along its sides across every inch of circumference around it. Also, check any space between each element (such as dust motes).
Now, the various parts of the subwoofer that we detached earlier, shouldn’t move! If they do, take your soldering iron and apply a bit of heat to the area where the problem is buzzing around. It Should solve any issues with vibration within seconds.
Finally, attach the cone back onto its frame after applying some glue to both sides (the outside and inside). Let it stand for 24 hours so that everything sets in place correctly.
The subwoofer is now ready to be connected! High-quality sound has never been so accessible.
Final Words:
If your subwoofer is damaged and needs repair, don’t throw it away or replace it with a new one. In most cases, you can fix the problem yourself by following the above-mentioned steps to repair the damage.
Doing so is cheaper than taking it to an audio specialist, and I hope this article will also help hone your DIY skills! Ask any questions that I may not have covered in this blog post below or on our website, as we want everyone to enjoy their music at its best!
Here are some other great reads that you might enjoy
Ford Stereo Wiring Color Code & Diagram
Pioneer Wiring Harness Color Codes & Diagram
How To Improve Your Home Theater Sound?
How To Connect Yamaha Soundbar To Tv?
How To Clean iPhone Speakers
How To Turn On Bose Soundbar Without Remote: Easy Methods
How To Connect Soundbar To Tv With HDMI?
How To Reset Vizio TV Without Remote (Quick SOLUTION!)
How To Wire A 4 Channel Amp To 6 Speakers?
How To Connect JBL Speakers To Each Other?


Jeremy Pople says
Thank you for sharing your knowledge with myself and well everyone who might read this very helpful article. You have most likely saved me a few hundred dollars and now you have me jumping in dumpsters at audio specialty stores and waiting for people who have nice stereos to either die or have me over as a guest, where I will “accidentally ” blow their speakers and then be the one to fetch them when they set them out to the curb. It would be much easier if everyone who has a nice stereo would just get caught up in the gears of a combine. However as awesome as that would be, it’s highly unlikely. But tell all your friends to fire up their combines and head my way.lol
They will all be rewarded with a job that only requires them to suck farts out of city bus seat and pays in breath mints
Thank you again for your expert advice!