Ford vehicles are equipped with various audio systems, each with its unique wiring color code. Understanding these color codes is crucial when installing an aftermarket stereo or repairing an existing audio system.
So, in this article, we will discuss the standard Ford stereo wiring color code as well as some variations that may be found in specific models. By familiarizing yourself with these color codes, you can ensure a successful and hassle-free installation or repair of your Ford audio system.
We will also provide a step-by-step guide on how to install a Ford stereo system and highlight common mistakes to avoid during the installation process.
So, let’s get into it!
- How To Understand Ford Wire Harness Color Code?
- Ford Stereo Wiring General Diagram
- 94 Ford Laser Radio Wiring Color Code
- Ford Explorer Stereo Wiring Color Code (2004)
- Ford F150 Stereo Wiring Color Code (2001)
- Ford F150 Stereo Wiring Color Code (2006)
- Ford F150 Stereo Wiring Installation Guide
- Common Mistakes:
- Recommendations
- Factory Wiring Harness Ford Radio Wire Harness Color Codes
- Conclusion
- Frequently Asked Questions
How To Understand Ford Wire Harness Color Code?

Basically, there are two types of Ford stereo wires:
- Standard Wires
- Speaker Wires
Standard Wires
The standard set of wires in a 16-pin harness includes the following:
Red Wire
This is the +12v ignition wire, which only supplies power to the stereo when the key is turned.
Yellow Wire
This is the +12v constant wire, which supplies power to the radio to save memory settings such as time and the last played song.
Black Wire
This is the -12v ground wire, which should be connected to the old harness or to a clean and secure contact on the car’s metal frame.
Solid Blue Wire
This is the “Power Antenna” wire, which is used to power the car’s antenna if it is a power antenna.
Blue Wire With White Stripe
This wire is used to connect the stereo to an external amplifier.
Solid Orange Wire
This is the “Illumination” wire, which powers the lights on the stereo.
Orange Wire with White Stripe
This dimmer wire allows the stereo lights to dim when the headlights or parking lights are on.
Brown Wire
This is the “Phone Mute” wire, which lowers the stereo’s volume when a call is being made or received.
Speaker Wires
The next eight standard wires are the speaker wires, which are classified by color:
- Gray wire
- Gray wire with black stripe
- White wire
- White wire with black stripe
- Violet wire
- Violet wire with black stripe
- Green wire
- Green wire with black stripe
The wires with the stripe going through them are the negative wires, while the solid-colored wires are the positive wires. It is important to connect the positive wire to the positive terminal on the speaker and the negative wire to the negative terminal to get the most out of your speakers.
One thing to keep in mind is that age and heat can cause the color of the wires to change. For example, you may notice no white wires in the wiring harness or that the gray wire looks more brown.
It is important to take your time and go slowly when installing a new stereo, first connecting the wires that you are certain of and then sorting through the ones that may be a little confusing.
Also Read – Pioneer Wiring Harness Color Codes
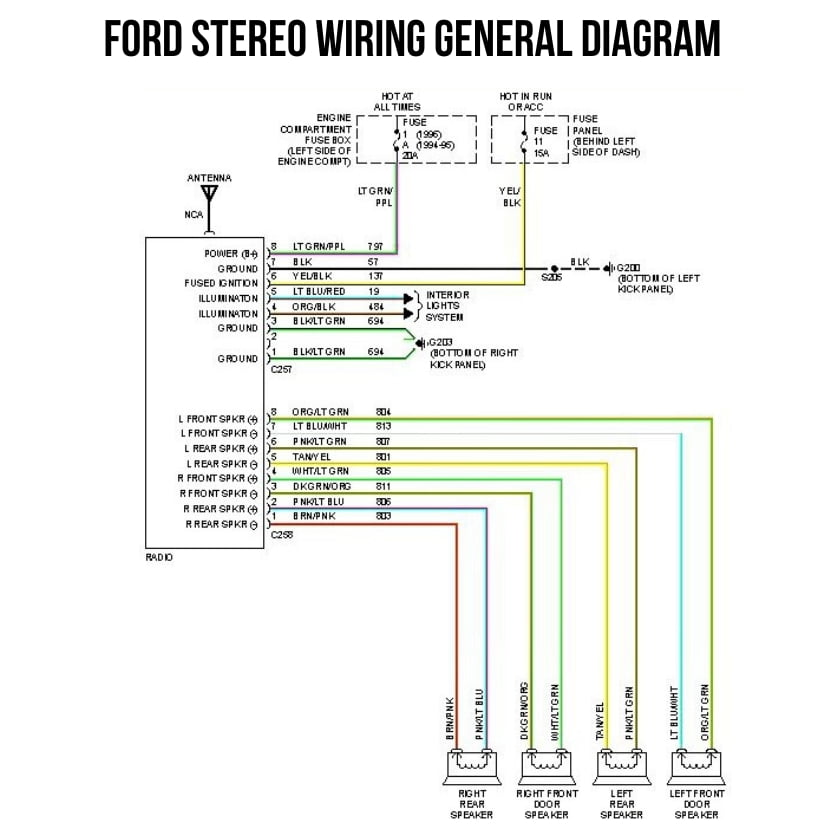
Ford Stereo Wiring General Diagram
94 Ford Laser Radio Wiring Color Code
| Color | Code | Color | Code |
| Black | B | Light Green | LG |
| Blue | L | Orange | 0 |
| Brown | BR | Pink | p |
| Dark Blue | OL | Red | A |
| Dark Green | DG | Sky Blue | SB |
| Gray | GY | Violet | v |
| Green | G | White | w |
| Light Blue | LB | Yellow | y |
Blue/Yellow Wire
This is the constant 12v+ wire, which provides a constant source of power to the radio. This wire is typically connected to the battery or a fuse box.
Gray Wire
This is the switched 12v+ wire, which provides power to the radio only when the ignition is turned on. This wire is typically connected to the ignition switch.
Brown Wire
This is the ground wire, which grounds the radio system. This wire is typically connected to the chassis of the vehicle.
Green Wire
This is the illumination wire, which powers the backlighting of the radio.
Speaker Wires
- For the front speakers, the left speaker has a pink positive wire (+) and a violet negative wire (-).
- The right speaker has a light green positive wire (+) and a blue negative wire (-).
- For the rear speakers, the left speaker has a black positive wire (+) and a yellow negative wire (-).
- The right speaker has a red positive wire (+) and a white negative wire (-).
Ford Explorer Stereo Wiring Color Code (2004)
| Pin | Circuit | Circuit Function |
| 1 | 1559 (RD) | DVD Player to Audio Unit, Left, + |
| 2 | 1560 (WH) | DVD Player to Audio IS1il, Left |
| 3 | Not Used | |
| 4 | Not Used | |
| 5 | Not Used | |
| 6 | 1080 (LG/BK) | Audio System ON (ASYSON) |
| 7 | 832 (UWK) | Audio Corporate Protocol A |
| 8 | 833 (TN) | Audio Corporate Protocol B |
| 9 | 1581(00) | DVD Player to Audio Unit, Right + |
| 10 | 15112(YE) | DVD Player to Audio unit, Right |
| 11 | Not Used | |
| 12 | Not Used | |
| 13 | Not Used | |
| 14 | Not Used |
Ford F150 Stereo Wiring Color Code (2001)
| Pin | Circuit | Circuit Function |
| 1 | 19 (LB/RD) | Illumination |
| 2 | 57 (BK) | Illumination, Ground |
| 3 | 1000 (AO/BK) | Voltage supplied In start (overload protected) |
| 4 | – | Not used |
| 5 | 802 (00/RD) | Speaker, Right rear (18806) + |
| 6 | 803 (BN/PK) | Speaker, Right rear (18808) – |
| 7 | 805 (WH/LG) | Speaker, Right front (18806) + |
| 8 | 811 (OO/OG) | Speaker, Right front (18806) – |
| 9 | 797 (LGNT) | Voltage supplied at all times (overload protected) |
| 10 | 1002 (BK/PK) | Voltage in run or Accessory (overload protected) |
| 11 | 694 (BK/LG) | Audio, Ground |
| 12 | BOO(GY/LB) | Speaker, Left rear(18808) + |
| 13 | 801(TN/YE) | Speaker, left rear (18808) – |
| 14 | 804 (OG/LG) | Speaker. Left front (18808) + |
| 15 | 813 (LBN/H) | Speaker, Left front (18808) – |
| 16 | 694 (BK/LG) | Audio, Ground |
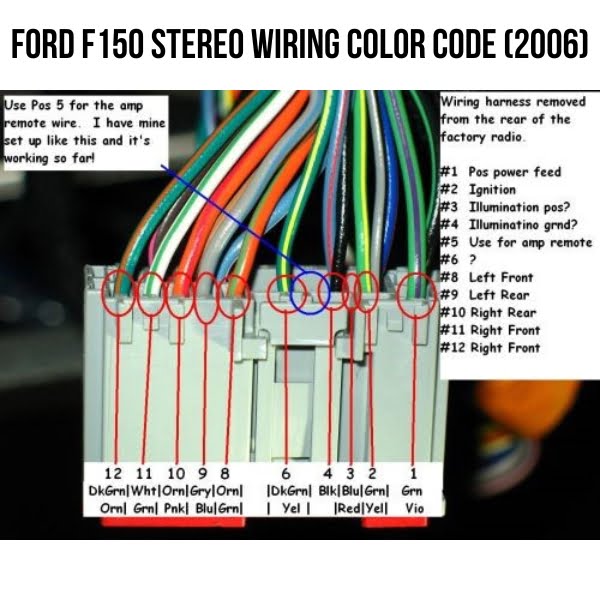
Ford F150 Stereo Wiring Color Code (2006)
Ford F150 Stereo Wiring Installation Guide
Gather the Necessary Tools and Materials
- Wiring harness adapter
- Wire stripper
- Wire connectors
- Screwdriver
Disconnect The Negative Terminal of the Vehicle’s Battery
To avoid any electrical mishaps, it is important to disconnect the negative terminal of the vehicle’s battery before beginning the installation process.
Remove The Dashboard Panel or Trim
The dashboard panel or trim will need to be removed to access the wiring behind the stereo. The process of removing these components may change in accordance with the particular make and model of the model you own. Consult the owner’s manual for specific instructions on how to remove the dashboard panel or trim.
Connect The Wire Harness Adapter
Match the wiring colors and attach the wire harness adapter to the vehicle’s wiring and the new stereo.
Mount The New Stereo
Once the wire harness adapter is properly connected, the new stereo can be mounted to the dashboard using the screws and mounting brackets provided in the package. Carefully follow the manufacturer’s instructions to ensure that the stereo is securely and properly mounted.
Attach The Cable to The Battery
After the new stereo is mounted, attach the cable to the negative terminal of the vehicle’s battery that we disconnected earlier.
Test The New Stereo
Before completing the installation process, it is important to test the new stereo to ensure it is functioning properly. Turn on the stereo, adjust the volume, and test any additional features, such as Bluetooth connectivity or the CD player.
Common Mistakes:
Not Disconnecting the Negative Terminal of the Battery
Failing to disconnect the battery’s negative terminal before beginning the installation process can lead to electrical accidents and damage to the vehicle’s electrical system.
Not Using a Wiring Harness Adapter
Using a wiring harness adapter simplifies the installation process and helps to ensure a proper connection between the vehicle’s wiring and the new stereo. Without a wiring harness adapter, you may need to splice the wires together, which can be difficult and may result in a poor connection.
Not Securing the Stereo Properly
Failing to secure the stereo properly can make it loose or fall out of place, which can be dangerous while driving. Make sure to use the mounting brackets and screws provided to secure the stereo firmly in place.
Recommendations
- Ensure you have all the necessary tools and equipment, such as wire strippers, wire connectors, and a wiring diagram.
- Carefully follow the manufacturer’s instructions for installing the new stereo and connecting the wiring harness.
- If you are unsure about any aspect of the installation process, it is recommended that you seek the assistance of a mechanic or professional car audio installation service.
- Be sure to test the new stereo and all of its functions before reassembling the dashboard and closing up the vehicle.
- If you are installing an aftermarket stereo, retaining the factory wiring harness is a good idea if you ever need to reinstall the factory stereo or sell the vehicle.
- If you are replacing the factory stereo with an aftermarket unit, you may need to purchase additional components, such as an adapter or interface, to ensure compatibility with your vehicle.
- Be sure to properly secure any loose wires or cables to avoid damage or interference with other components of your vehicle.
Factory Wiring Harness Ford Radio Wire Harness Color Codes
Factory wiring harnesses for Ford radios often use a standard color coding system. Here is a general guide:
- Black: Ground
- Red: Power (12V)
- Yellow: Constant power
- Blue: Power antenna
- Blue/White: Amplifier turn on
- Orange: Illumination
- Orange/Black: Dimmer
- Gray: Front right speaker (+)
- Gray/Black: Front right speaker (-)
- White: Front left speaker (+)
- White/Black: Front left speaker (-)
- Violet: Rear right speaker (+)
- Violet/Black: Rear right speaker (-)
- Green: Rear left speaker (+)
- Green/Black: Rear left speaker (-)
Conclusion
Installing a new stereo in your Ford vehicle can be a rewarding task. Still, it is important to understand the wiring color code and take the necessary precautions to ensure a safe and successful installation. Following the steps outlined in this article and avoiding common mistakes, you can confidently upgrade or repair your Ford’s stereo system.
Frequently Asked Questions
Can I Use a Different Brand of Stereo in My Ford Vehicle?
You can use a different stereo brand in your Ford vehicle as long as it is compatible with your vehicle’s wiring and fits properly in the dashboard. However, it is generally recommended to use a stereo specifically designed for use in your vehicle’s make and model, as this will ensure the best fit and performance.
Will Install a New Ford Stereo Void My Vehicle’s Warranty?
Installing a new Ford stereo should not void your vehicle’s warranty, as long as the installation is performed properly and does not damage any other vehicle components. However, it is always a good idea to check with your dealership or manufacturer to confirm whether any modifications to your vehicle may affect your warranty coverage.
Can I Install a New Ford Stereo Myself?
It is generally possible to install a new Ford stereo yourself, provided that you have some basic mechanical skills and knowledge of electrical wiring. However, if you are not comfortable working on your vehicle or are unsure how to properly connect the wiring harness, it is recommended to seek the assistance of a mechanic or professional car audio installation service.
How Do I Find the Ford Stereo Wiring Color Code for My Vehicle?
The Ford stereo wiring color code can usually be found in the owner’s manual for your vehicle. It may also be available online or through a dealership or mechanic.


Leave a Reply