![Pioneer Wiring Harness Color Codes & Diagram [2024]](https://speakersninja.com/wp-content/uploads/2022/12/Pioneer-Wiring-Harness-Color-Code.jpg)
Installing a car stereo can be challenging, especially for those unfamiliar with the inner workings of a car’s electrical system. One of the main challenges of installing a car stereo is correctly identifying and connecting the wires in the wiring harness.
Fortunately, most car stereo wiring harnesses are color-coded to make this task easier, with each wire labeled with a specific color to indicate its function.
In this article, we will discuss the Pioneer wiring harness color code used to identify the various wires in a Pioneer wiring harness. By understanding the Pioneer wiring harness color code, you can easily identify and connect the wires in your car’s wiring harness and install your car stereo confidently.
- How To Understand Pioneer Wiring Harness Color Codes?
- Yellow Wire
- Red Wire
- Black Wire
- Black Wire with White Stripe
- Blue Wire
- Blue Wire with White Stripe
- Orange Wire
- Orange with White Stripe
- Orange Wire with Black Stripe
- Brown Wire
- White Wire
- White Wire with Black Stripe
- Grey Wire
- Grey Wire with Black Stripe
- Green
- Green Wire with Black Stripe
- Purple Wire
- Purple Wire with Black Stripe
- Pioneer Wiring Harness Color Code Table
- Tips for Identifying Wiring Harness Color Codes
- Pioneer Wiring Harness Installation Guide
- Conclusions
- Frequently Asked Questions
How To Understand Pioneer Wiring Harness Color Codes?

Here is a general guide to the colors and functions of the wires in a Pioneer wiring harness:
Yellow Wire
The yellow wire is the continuous power wire, also often referred to as the memory wire. This wire provides power to the car stereo even when the ignition is turned off so that the stereo can retain its settings and any stored media. This cable has to be permanently attached to the battery or another reliable power source.
Red Wire
The red wire is the accessory power wire, which provides power to the car stereo when the ignition is turned on. This wire should be connected to a switched power source, such as the ignition switch or a fuse in the fuse box.
Black Wire
The black wire is the ground wire, which provides a path for electricity to flow to the car stereo. This wire should be connected to a metal ground point in the vehicle, such as a screw or bolt on the chassis.
Black Wire with White Stripe
The black with white stripe wire in a car stereo wiring harness is typically used as a ground wire for the factory amplifier. The factory amplifier is an audio amplifier that is installed in the vehicle at the factory and is used to power the car’s speakers.
The black with white stripe wire is connected to the factory amplifier’s ground terminal, which helps complete the electrical circuit and allows the amplifier to function properly.
Blue Wire
The blue wire may be used to power the antenna when the car stereo is on. The specific function of the blue wire may vary depending on the specific model of the Pioneer wiring harness and the car stereo it is connected to.
Blue Wire with White Stripe
The blue wire with a white stripe can be used as the amplifier turn-on wire.
Orange Wire
The orange wire in a car audio system is typically used for illumination dimming.
Orange with White Stripe
The orange wire in a car audio system may be used as a dash light dimmer wire. The dash light dimmer wire is used to connect the head unit to the vehicle’s dash light dimmer switch, which adjusts the brightness of the dashboard lights.
Orange Wire with Black Stripe
The orange with black stripe wire in a car audio system can be used as a dimmer ground wire and a negative trigger wire for certain circuits.
Brown Wire
The brown wire in a car audio system is typically used for audio mute. When the audio mute wire is connected to the head unit and activated, it will mute the audio output from the speakers. This can be useful when you need to turn off the audio temporarily, such as when receiving a phone call or navigating through a toll booth.
White Wire
Positive wire for the left front speaker.
White Wire with Black Stripe
Negative wire for the left front speaker.
Grey Wire
Positive wire for the right Front speaker.
Grey Wire with Black Stripe
Negative wire for the right Front speaker.
Green
Positive wire for the Left Rear speaker.
Green Wire with Black Stripe
Negative wire for the Left Rear speaker.
Purple Wire
Positive wire for the Right rear speaker.
Purple Wire with Black Stripe
Negative wire for the Right rear speaker.
Also Read – Ford Stereo Wiring Color Code
Pioneer Wiring Harness Color Code Table
If you are still confused, you can use this table while connecting the harness.
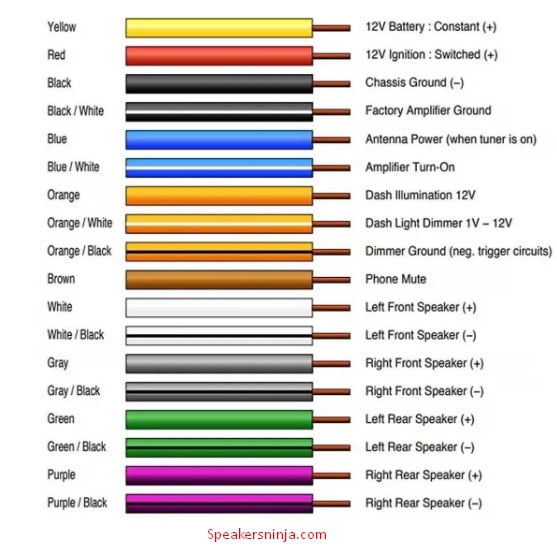
| Wire Color | Wiring Connections Function | Charge |
| Yellow | 12 V Battery – Constant | Positive |
| Red | 12 V Ignition – Switched | Positive |
| Black | Chassis Ground Wire | Negative |
| Black with White Stripe | Factory Amplifier Ground Wire | |
| Blue | Antenna power (car stereo is on) | |
| Blue with White Stripe | Amplifier Turn on | |
| Orange | Dash Illumination (12 V) | |
| Orange with White Stripe | Dash Light Dimmer Control( 1V – 12 V) | |
| Orange with Black Stripe | Dimmer Ground Wire | |
| Brown | Phone Mute | |
| White | Left Front Speaker | Positive |
| White with Black Stripe | Left Front Speaker | Negative |
| Gray | Right Front Speaker | Positive |
| Gray with Block Stripe | Right Front Speaker | Negative |
| Green | Left Rear Speaker | Positive |
| Green with Block Stripe | Left Rear Speaker | Negative |
| Purple | Right Rear Speaker | Positive |
| Purple with Block Stripe | Right Rear Speaker | Negative |
Tips for Identifying Wiring Harness Color Codes
Check The Manual
Checking the vehicle stereo instructions should be your first step. Many Pioneer car stereo manuals include a wiring diagram and a list of wire colors and their functions. This is the most reliable source of information for identifying the wiring harness color codes.
Use A Wiring Harness Adapter
If your car stereo does not come with a wiring harness, you may need to use a wiring harness adapter to connect the stereo to the vehicle’s wiring harness. These adapters are designed to match the wiring harness color codes for specific makes and models of vehicles. They can make the installation process much easier and save you the time and effort of trying to figure out the color codes yourself.
Use A Multimeter
A multimeter is a tool that can be used to measure the resistance, voltage, and current in an electrical circuit. It can be useful for identifying the functions of the wires in a wiring harness.
To use a multimeter to identify the wiring harness color codes, you will need to turn the ignition on and set the multimeter to measure voltage.
Then, one at a time, touch the probes of the multimeter to the wires in the wiring harness and observe the readings.
The wire that is providing power will show a higher voltage reading.
Consult a Professional
If you are unsure how to identify the wiring harness color codes or are uncomfortable working with electrical components, it’s always best to consult a professional. A car audio specialist or a mechanic should be able to help you identify the color codes and assist with installing the car stereo.
Pioneer Wiring Harness Installation Guide
Here are some general steps to follow:
Disconnect The Negative Battery Cable
Before beginning the installation, you must ensure that the negative battery wire has been disconnected. This will prevent any accidental electrocution or damage to the car’s electrical system.
Locate The Wiring Harness
The wiring harness is typically located behind the stereo unit. It is a bundle of wires that are connected to the back of the stereo and run to the various electrical components in the car.
Identify The Wires
Each wire in the wiring harness is usually labeled with a specific color code. It is important to correctly identify the wires before connecting them to ensure that the stereo functions properly.
Connect The Wiring Harness
Once you have identified the wires, you can connect the wiring harness to the back of the stereo unit. Make sure to match the wires with the correct connections on the stereo.
Connect The Ground Wire
The ground wire is typically a black wire that connects to a metal ground point in the car. This wire helps ensure the stereo is properly grounded and will function correctly.
Test the stereo
Once you have connected the wiring harness, you can test the stereo to ensure it works properly. Turn on the stereo and adjust the volume to ensure the speakers function correctly.
Secure The Wiring Harness
Once you have tested the stereo and ensured it is working properly, you can secure the wiring harness. This may involve tucking the wires behind the dashboard or securing them with wire ties.
Reconnect The Battery Cable
Once you have finished the installation, you can reconnect the negative battery cable to complete the process.
Conclusions
The Pioneer wiring harness color code is a standardized system used to identify the function of each wire in a Pioneer wiring harness. The color of each wire indicates its function, such as yellow for constant power, red for accessory power, black for ground, and blue for power antenna or remote turn-on for amplifiers.
Other colors, such as orange, brown, white, and gray, are used to identify the positive and negative wires for the vehicle’s speakers.
It is important to correctly identify and connect the wires in the wiring harness to ensure the proper functioning of the car stereo and other electrical components in the vehicle.
Frequently Asked Questions
Can I Splice it into an Existing Wiring Harness in My Car?
It is generally not recommended to splice into an existing wiring harness, as it can cause issues with the car’s electrical system and potentially damage other components. If you need to add a component to your car’s electrical system, it is usually best to use a wiring harness that is specifically designed for that component.
What Are the Most Common Causes of Wiring Harness Issues?
Wiring harness issues can be caused by various factors, including physical damage, corrosion, and wear and tear over time. Moisture and exposure to extreme temperatures can also cause problems with a wiring harness.
How Can I Prevent Wiring Harness Issues?
It is important to keep the wires and connectors clean and dry to prevent wiring harness issues and protect them from physical damage. In addition, doing routine maintenance and inspections can assist in identifying possible faults before they develop into more significant problems.
Can A Wiring Harness Be Upgraded or Modified?
In some cases, upgrading or modifying a wiring harness to improve its performance or adding additional features may be possible. However, it is important to ensure that any modifications are done by a professional and do not compromise the integrity or safety of the car’s electrical system.
Here are some other great reads that you might enjoy
Leave a Reply